Are you looking for a way to turn your scrap wood into something special? If you’ve got leftover wood from past projects piling up, you’re not alone. Many of us face this common dilemma, and that’s why I created this post. There’s nothing quite like the satisfaction of transforming those pieces into beautiful art that adds a rustic charm to your home.
This post is for all you DIY lovers out there. If you enjoy crafting, decorating, or simply want to spruce up your walls without breaking the bank, you’ll find plenty of inspiration here. Whether you’re a seasoned woodworker or just getting started, these projects will speak to your creative side and encourage you to dive in.
So, what can you expect? I’ve gathered 28 unique scrap wood art projects that are both fun to make and stunning to behold. Each idea is designed to bring a cozy, rustic feel to your space while helping you utilize those wood scraps you might otherwise toss. You’ll find step-by-step guides and tips that make each project approachable, no matter your skill level.
Let’s get started on your journey to creating one-of-a-kind wall decor that not only showcases your creativity but also tells a story. Grab your tools and get ready to transform those neglected scraps into something you’ll be proud to display!
1. Rustic Wood Pallet Sign

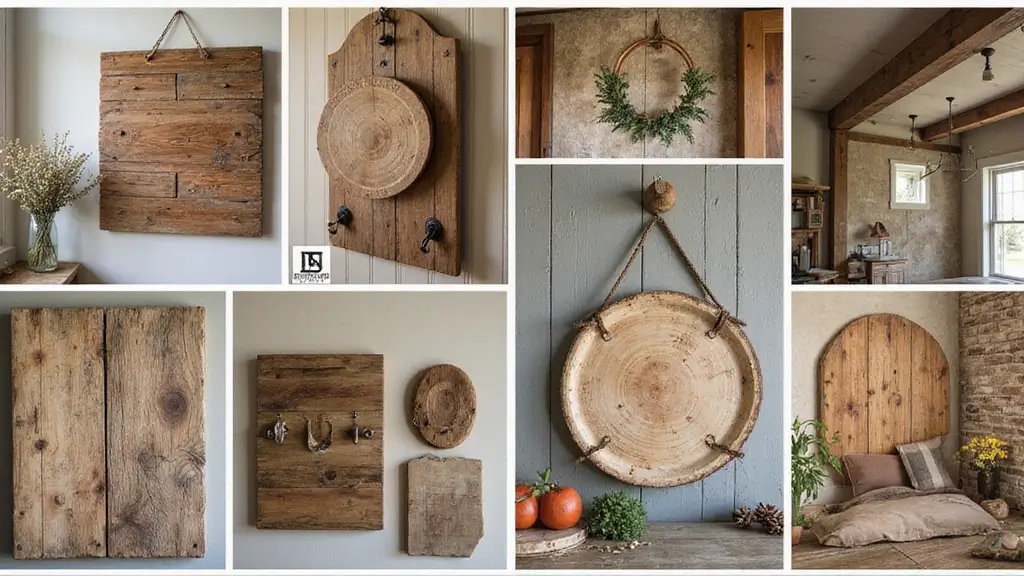
Create a Rustic Wood Pallet Sign to add warmth and charm to your home. These signs offer a unique touch that can suit any decor style. Start by carefully taking apart an old wooden pallet. You’ll uncover boards with rich textures and character. Sand them down to create a smooth surface, then choose a paint or stain that complements your space. Popular colors include soft whites, weathered grays, or earthy browns, which align perfectly with current home decor trends.
Once your boards are prepped, let your creativity shine! You can use stencils to paint your favorite quotes, family names, or even the coordinates of special locations. Hang your finished sign in the living room, or let it greet guests in the entryway for a cozy welcome. This personalized touch makes your home feel unique and inviting.
\n\n
Here are some practical tips to help you create your rustic wood pallet sign:
Use outdoor paint for longer-lasting durability if you plan to display your sign outside.
Choose contrasting colors for your text and background to make your message pop.
Pick a size that fits your space—smaller signs work well in clusters, while larger ones can stand alone as statement pieces.
Add embellishments like twine or small decorative items to enhance the rustic look.
\n\n
With these steps, you can transform simple scrap wood into a stunning piece of art. Not only is this project budget-friendly, but it also allows for personal expression. Whether you make it for yourself or as a thoughtful gift, this rustic sign will surely bring joy to any space.
Rustic Wood Pallet Sign
Editor’s Choice

Rust-Oleum 1979502 Painter’s Touch Latex Paint, Quart, Gloss Black, 1 Quart

Auhoahsil Stencil Brushes Set, 5 Pcs Natural Bristle Wooden Handle Templ…

90PCS Premium Micro Detail Sander Kit, Updated 3-in-1 Mini Hand Sanding …
2. Upcycled Wooden Frames

Revitalize your space by turning scrap wood into charming upcycled wooden frames! These frames can add a rustic flair to your home and showcase your cherished memories. Picture your favorite family photos or artwork beautifully displayed in layered frames with varying widths. Choose bold colors to create a striking contrast or opt for warm stains to achieve a classic, timeless look. Pinterest is buzzing with ideas for eclectic gallery walls that blend different styles, inviting warmth and personality into any room.
To get started, gather your scrap wood and decide on a design. You can easily make frames of different sizes and shapes to create a unique display. Look for secondhand glass or backing at thrift stores to keep your project budget-friendly. Mixing textures and colors will not only enhance visual interest but also let your creativity shine. This charming decor will make your space feel intimate and inviting, perfect for sparking conversations with guests.
• Gather scrap wood of varying sizes for diverse frames
• Paint or stain in contrasting colors for added flair
• Mix different styles for a personalized gallery wall
• Secure glass with washi tape for a playful touch
This DIY project is a fantastic way to showcase your creativity while also giving new life to old materials. You’ll love how your upcycled wooden frames can tell your story and reflect your personal style.
Upcycled Wooden Frames
Editor’s Choice

SamaN Staining Kit – Includes Sponge, 2 Cloths and Gloves to Effectively…

50 Rolls Washi Tape Set, Decorative Adhesive Tape for Scrapbook, Arts & …

Picture Frame Hardware Kit, 100 Turn Button Fasteners, 100 Screws, Black…
3. Wooden Heart Wall Art

Create a stunning wooden heart wall art piece that adds warmth and love to any room. This charming decoration is perfect for bedrooms, cozy nooks, or even as a heartfelt gift. You can use various scrap wood pieces to form a heart shape, mixing different wood tones for a rustic feel. Whether you leave the wood natural or paint it in your favorite colors, this project is sure to capture attention. Pinterest is buzzing with heart-shaped decor ideas, making this a trendy choice for your home.
To get started, gather your scrap wood and cut it into heart shapes or arrange pieces to form a heart. You can layer the wood for added depth, creating a unique 3D effect. For a budget-friendly option, look for leftover wood pieces from local hardware stores or even repurpose old furniture. Hang your heart art with twine for that extra touch of rustic charm, making your space feel inviting and personal.
Here are some practical tips:
• Use different wood tones for a layered effect.
• Choose twine for hanging to enhance the rustic look.
• Pick colors that match your room’s decor to tie it all together.
• Add embellishments like small flowers or quotes for a personal touch.
This DIY project not only brightens your space but also offers a creative outlet for your artistic side. Enjoy the process of making something beautiful that speaks to your heart!
Wooden Heart Wall Art
Editor’s Choice

Gorilla Wood Glue; 8 Ounce Bottle; Natural Wood Color; (Pack of 1)

200Pcs Hang Tag String, 7.1-inch Hemp Twine Hang Tag String Hanging Tag …

4. Geometric Wood Art

Geometric wood art adds a fresh, modern vibe to your home decor. These eye-catching designs are perfect for showcasing your creativity using scrap wood. Think about using shapes like triangles, hexagons, or squares cut from your leftover wood pieces. You can arrange these shapes on a baseboard and paint them in fun, complementary colors. This trend is hot on Pinterest, and it’s a great way to add a pop of style to a statement wall in your living room or hallway.
To get started, gather your scrap wood and a few basic tools. You can easily find affordable wood at local hardware stores or even repurpose old furniture. Arrange your shapes in a pattern that speaks to you. Consider mixing sizes to create depth and excitement in your design. If you’re feeling adventurous, using a laser cutter can help you achieve intricate and precise designs. This extra detail can take your project to the next level, making it a standout piece in your space.
• Choose a mix of shapes for variety
• Paint in trendy colors for a modern touch
• Arrange pieces on a baseboard for easy installation
• Use a laser cutter for detailed designs
Creating geometric wood art is not only fun, but it also gives your home a unique charm. It’s an affordable project that will make your space feel warm and inviting. You’ll love how a simple arrangement of shapes can transform your walls into a stunning focal point. So grab your wood scraps and get crafting!
5. Scrap Wood Shelves

Create stunning scrap wood shelves that blend style and function! These shelves not only provide storage but also add that rustic touch you’ve been dreaming of. Choose thicker pieces of wood for durability, and feel free to mix different wood types for added character. Consider using a rich brown stain to enhance the wood’s natural beauty, especially against lighter wall colors. You can find inspiration on platforms like Pinterest, where unique shelving designs are trending.
To make your own shelves, start by cutting the wood to your preferred lengths. Sand the edges to smooth out any rough spots. Next, attach sturdy brackets or even go for a floating shelf design by securing them directly to the wall. This method keeps your space looking clean and open. Think about adding some plants or favorite decor pieces on these shelves to bring the area to life, making your home feel warm and inviting.
• Choose thicker wood for strength and style.
• Stain in darker shades for contrast.
• Mix wood types for a unique look.
• Secure brackets for easy installation.
With these tips, you’ll create beautiful, functional shelves that elevate your home decor. Enjoy the satisfaction of crafting something truly personal and practical!
6. Wooden Ladder Decor

Bring a touch of rustic charm to your home with an old wooden ladder! This unique decor piece can transform any space into a cozy retreat. Picture a weathered ladder leaning against your wall, adorned with soft blankets or vibrant plants cascading from the rungs. You might even consider a trendy twist—perhaps a fresh coat of paint or natural twine wrapped around the rungs for a personal flair. Pinterest is buzzing with these creative ideas, showcasing how a simple ladder can elevate your decor.
To get started, first, give your ladder a good sanding to smooth out any rough spots. This step ensures it’s safe for display and ready for your creative touches. You can often find old ladders at thrift stores or garage sales, making this project budget-friendly. Once you have your ladder, lean it against a wall in your living room or bedroom. Use it to hang throws, display books, or even showcase plants in cute pots. This setup not only adds style but also creates a warm, inviting atmosphere in your home.
Here are some quick tips to enhance your ladder decor:
Use sturdy brackets to secure it in high-traffic areas.
Choose a color that complements your existing decor, like soft pastels or rich earth tones.
Pick lightweight items to hang for easy access and a clutter-free look.
Add hooks on the sides to maximize your hanging options for keys or scarves.
With these simple adjustments, your wooden ladder can become a stunning focal point that invites warmth and character into your space.
A wooden ladder isn’t just for climbing—it’s a canvas for creativity! Transform an old ladder into rustic wall decor, showcasing your favorite blankets or plants for that cozy farmhouse feel.
7. Scrap Wood Coasters

Create beautiful coasters from your scrap wood to add a rustic touch to your home. These coasters not only protect your surfaces but also showcase your creativity. You can cut them into fun shapes like squares, circles, or even hexagons. Sand them well for a smooth finish that feels great in your hand. You can leave them natural for a raw look or apply a food-safe finish to guard against moisture. Pinterest is full of inspiration for unique designs that make your coasters stand out.
To make your coasters even more special, try personalizing them. Wood-burning techniques allow you to etch designs or initials into the surface. This adds a personal flair that guests will admire. Plus, you can use leftover paint or stains to create a mismatched set that feels intentional. Look for scrap wood in various colors and textures to make your coasters visually interesting. These coasters can make your coffee table feel warm and inviting, perfect for gatherings or quiet moments with a book.
• Cut wood into squares, circles, or unique shapes for variety.
• Sand edges for a smooth, polished finish.
• Use food-safe finishes for durability and moisture protection.
• Personalize with wood burning or paint for unique flair.
With these tips, you can create charming coasters that are both practical and stylish. They will not only help keep your surfaces safe but also bring character to your space.
Scrap Wood Coasters
Editor’s Choice

Wood Burning Kit, Wood Burning Tool Adjustable Temperature Woodburning P…
8. Wooden Wall Clock

Creating a stunning wall clock from scrap wood can add a charming personal touch to your home. This DIY project not only serves a practical purpose but also showcases your unique style. You can start with a round piece of reclaimed wood as your base. Think about sanding it down to a smooth finish, then attach clock hands using a simple clock mechanism kit found at most craft stores. For the numbers, consider painting them directly onto the wood or using smaller cut pieces for a 3D effect. Pinterest is filled with ideas showing how these rustic clocks can become stunning focal points in any room.
When tackling this project, keep it budget-friendly. Look for scrap wood at local hardware stores or even in your garage. You don’t need expensive materials to create something beautiful. Try mixing different wood tones or adding a splash of color to the clock hands for contrast. Remember, the aim is to make your space feel welcoming and unique. A personalized clock can bring warmth and character to your walls, making it perfect for cozy living areas or personal offices.
• Choose reclaimed wood for a rustic feel
• Mix colors for clock hands to stand out
• Paint numbers directly on the face for a modern touch
• Experiment with shapes like squares or hexagons for variety
This project is not just about telling time; it’s about creating a piece that reflects who you are and enhances your living space.
Wooden Wall Clock
Editor’s Choice

2Pcs Quartz Clock Mechanism Kit, Wall Clock Mechanisms Mattery Powered R…

Rockin’ Wood Real Wood Nail Up Application Rustic Reclaimed Naturally We…

Acrylic Paint Set of 12 Colors 2fl oz 60ml Bottles,Non Toxic 12 Colors A…
9. Wood Slice Art

Create beautiful wall art with wood slices. These natural pieces add a rustic touch to your home. You can use slices of various sizes to form interesting patterns. Try arranging them in a circular layout to mimic flowers or in abstract shapes for a modern twist. You can leave the wood’s natural finish for an earthy look or paint them in bright colors for a pop of fun. Pinterest is full of inspiration for wood slice designs, showing how versatile this material can be!
\n\n
When you start your project, gather wood slices from local craft stores or even your backyard. Mixing different thicknesses adds depth to your design. For a budget-friendly option, look for leftover wood from construction sites or repurpose old furniture. Secure each slice with glue and reinforce them with nails for durability. This method fits perfectly with farmhouse or rustic decor, making your space feel warm and inviting.
\n\n
• Gather various sizes for a dynamic look
• Paint slices to match your color scheme
• Mix thicknesses to create depth and interest
• Use glue and nails for sturdy attachment
\n\n
These wood slice art projects not only beautify your walls but also give your home a personal touch. Whether you’re creating a focal point in your living room or adding character to a hallway, these pieces will surely impress visitors.
10. Reclaimed Wood Wreath

Create a stunning reclaimed wood wreath to bring a rustic charm to your home. This unique piece can brighten up any door or wall and serves as an eye-catching focal point. Imagine using pieces of wood in shades of brown and gray, cut into leaf shapes, and arranged in a perfect circle. You can even add touches like dried flowers, burlap, or colorful ribbons to give it a more festive flair. Pinterest is buzzing with these wreaths, showcasing how they add warmth and personality to any space.
To get started, gather scrap wood you have lying around or visit a local lumberyard for affordable pieces. Use a grapevine wreath as your base; it adds texture and makes your wood pieces pop. Layer the wood for a fuller look, and don’t hesitate to paint them in seasonal colors. This wreath is easy to update for different holidays, making it a versatile decor item that keeps your home feeling fresh and inviting.
Tips for Your Reclaimed Wood Wreath:
• Cut wood pieces into various foliage shapes for an organic look.
• Use a grapevine base to enhance texture and depth.
• Layer painted wood pieces for a colorful, fuller appearance.
• Change embellishments seasonally to keep your decor fresh.
Creating a reclaimed wood wreath is a fun project that leaves a lasting impression. It’s a budget-friendly way to express your style while making your space feel cozy and welcoming.
11. Scrap Wood Birdhouses

Create charming scrap wood birdhouses to invite beautiful birds into your garden. Each birdhouse can tell its own story. Use different types of wood, like pine or cedar, and mix in colors to make unique designs that catch the eye. Pinterest is buzzing with ideas for these delightful additions, showcasing everything from simple boxes to whimsical shapes. Let your creativity flow!
To get started, gather some scrap wood you already have. You can find tutorials online that guide you through building your birdhouse step by step. Remember to drill holes for ventilation and drainage. This keeps the birds cozy and safe. You can leave the wood natural for a rustic look or add a splash of color with non-toxic paint. This way, you don’t harm your feathered friends.
Tips for Your Birdhouses:
• Choose various wood types for a unique look
• Use non-toxic paint to keep birds safe
• Place birdhouses at different heights for fun
• Add decorative elements like twigs or flowers
These little creations not only beautify your garden but also provide a sanctuary for birds. Imagine watching them flutter in and out, bringing life to your outdoor space. Building birdhouses is a fun, budget-friendly project that can make your garden feel alive and welcoming!
12. Wood Panel Art

Bring your walls to life with stunning wood panel art! This project allows you to create a large, eye-catching piece using strips of scrap wood. Arrange the pieces on a canvas or even directly on your wall for a unique look. Imagine using rich browns and warm tones to evoke a rustic feel, or painting everything in sleek white for a modern vibe. Trends on platforms like Pinterest show that this style is not just popular; it’s a great conversation starter.
To start your wood panel art, gather different strips of scrap wood. You can mix widths and colors to add depth and interest. Plan your arrangement before you start gluing or nailing pieces to the wall. Don’t worry if you’re on a budget; you can often find scrap wood at local hardware stores or even in your garage. This project not only enhances your decor but also gives your space a personal touch, making it feel warm and inviting.
• Choose a variety of wood types for texture and character.
• Pick a color scheme that matches your room’s style.
• Add different widths for a more dynamic look.
• Place your art above furniture to create a focal point.
This wood panel art project is perfect for anyone wanting to add a bit of charm and individuality to their home. Get creative, and let your personality shine through your art!
Wood Panel Art
Editor’s Choice

2.0fl oz/60ml Wood Glue for Furniture Repair: Strong Lasting Bond & Wate…
13. Scrap Wood Plant Holders

Bring a touch of rustic charm to your home with handmade scrap wood plant holders. These unique creations not only elevate your decor but also provide a cozy home for your favorite plants. Imagine using reclaimed wood to craft geometric shapes or sturdy boxes, each piece telling its own story. You can let your creativity flow and even make hanging planters by attaching ropes or chains for a stunning visual effect, just like the ideas trending on Pinterest.
To get started, gather some scrap wood pieces from your last DIY project or local hardware store. Cut them into shapes that match your style—think triangles, squares, or even whimsical designs. Use nails or screws to secure them firmly. You can keep the wood natural for a rustic feel, or add a coat of stain to match your existing furniture. This versatility makes them perfect for both indoor and outdoor spaces.
Your plant holders can be both functional and beautiful, adding life to any room or patio. Plus, they help you express your personal style while being budget-friendly!
- Add drainage holes to keep plants healthy and happy.
- Choose wood stains that complement your decor for a cohesive look.
- Use sturdy ropes to hang planters securely and stylishly.
- Mix different shapes for an eye-catching display.
Creating scrap wood plant holders is not just about the plants; it’s about making your space feel warm and inviting. So grab your tools and let your creativity blossom!
14. Wooden Name Signs

Create stunning wooden name signs that add a personal touch to any room in your home. Using scrap wood, you can cut out shapes that fit your space perfectly. Think about colors that match your decor. Soft pastels for a nursery or bold hues for a playroom can really make your sign pop. Pinterest trends show that these custom pieces are a hit in entryways, too, offering a warm welcome to guests.
To get started, gather your materials. You can often find scrap wood at local hardware stores or even your own garage. Use paint, stencils, or markers to add names or quotes. If you want a rustic vibe, consider using a wood-burning tool for the lettering. This technique gives your sign a handcrafted look. Pair your sign with natural elements like small twigs or dried flowers to enhance its charm.
Making these signs is affordable and fun, letting you showcase your creativity without breaking the bank. They can transform a plain wall into a meaningful space, perfect for kids’ rooms or family gatherings.
• Choose scrap wood for a budget-friendly project
• Paint or stain to match your home decor
• Add personal touches like family names or initials
• Hang near entryways for a welcoming touch
Your home tells a story – let your wooden name signs add a personal chapter! With scrap wood art DIY projects, you can create a warm welcome that reflects your unique style.
15. Scrap Wood Candle Holders

Brighten up your home with charming scrap wood candle holders! These simple yet stylish pieces can transform any space into a cozy retreat. Imagine using reclaimed wood in varying shades to create a rustic feel. You can place these holders on a dining table or a mantelpiece for a warm, inviting atmosphere. Pinterest trends show that mixing wood types adds a unique flair, making each candle holder a conversation starter.
To make your own, start by cutting scrap wood into pieces of your desired height. Drill holes just the right size for tea lights or pillar candles to fit snugly. If you’re feeling adventurous, try creating a multi-tiered holder for a dramatic effect. Remember to sand the edges well; this ensures safety while the flames flicker. Best of all, this project is budget-friendly, allowing you to use leftover wood scraps you might already have.
Here are some quick tips to get started:
• Choose different wood types for a richer look.
• Sand edges well to prevent splinters and ensure safety.
• Place holders on various surfaces to create different moods.
• Add seasonal decorations around your holders for a festive touch.
With these candle holders, you can easily create a warm and inviting atmosphere in your home. Perfect for gatherings or quiet evenings, they add a personal touch that reflects your unique style. So gather your scraps and let your creativity shine!
16. Scrap Wood Mobile

Create a delightful scrap wood mobile that adds charm to any child’s room or cozy corner in your home. Using lightweight wood scraps, you can design whimsical shapes like stars, moons, or adorable birds. Paint them in bright colors to catch the eye. Hang these shapes from a sturdy wooden branch or a circular frame, using strings of different lengths to create a playful visual effect. This mobile not only beautifies the space but also entertains little ones, making it a perfect DIY project for parents.
To bring your mobile to life, gather pieces of scrap wood from your last project or pick up some affordable options at a local craft store. You can even use reclaimed wood for a rustic touch. If you’re on a budget, consider asking friends or family for leftover wood. The arrangement of your shapes can vary; think about spacing them out for a more dynamic look. This charming piece will make your space feel warm and inviting, perfect for sparking creativity and imagination in young minds.
• Choose lightweight wood scraps for easy hanging
• Paint shapes in bright colors to make them pop
• Hang from a sturdy branch or frame for added stability
• Vary string lengths for a whimsical effect
17. Scrap Wood Signs for the Garden

Transform your garden into a personal sanctuary with handmade wooden signs! These charming accents not only add character but also guide your visitors. You can create signs that label your favorite plants, share inspiring quotes, or mark pathways. Try using different colors or leaving the wood natural for that rustic charm. Pinterest is buzzing with ideas on how to make these signs pop in your outdoor space.
To get started, gather some scrap wood and cut it into fun shapes or simple rectangles. You can paint them in bright colors or use stencils for a more refined look. Seal them with a waterproof finish to keep them safe from rain or sun. This simple project is budget-friendly and can be completed in a weekend, adding warmth to your garden.
Here’s how you can make your garden signs stand out:
• Choose a theme for your signs—like herbs or flowers.
• Use bright, weatherproof paint to catch the eye.
• Pick whimsical shapes—think arrows, hearts, or leaves.
• Add a waterproof sealant for durability against the elements.
With your new wooden signs, your garden will feel more inviting and personal. Friends and family will appreciate the thoughtful touches, making your space feel like home. Plus, this project is a great way to express your creativity while keeping costs low.
Scrap Wood Signs for the Garden
Editor’s Choice

Olympic Patio Tones – Warm Biscuit – 1 Gallon – Non-slip acrylic deck an…

Thompson’s WaterSeal Multi-Surface Waterproofer Stain, Clear, 1 Gallon

Thyle 20 Pcs Welcome Stencils for Painting on Wood 11.81 x 5.91” Labor …
18. Wooden Photo Display

Bring warmth to your home with a stunning wooden photo display made from scrap wood. This project not only showcases your favorite memories but also adds a rustic charm to your decor. Imagine a long wooden base supporting vertical pieces of wood, forming a sturdy frame. You can paint these in soft pastels or leave them natural for that classic farmhouse vibe. As seen on Pinterest, this style fits perfectly in any cozy corner of your home, whether it’s your living room, hallway, or even a bedroom.
To create your photo display, start by measuring and cutting your scrap wood. Aim for a sturdy base and shorter vertical pieces to hold the photos. Use clips or strings to hang pictures, allowing you to swap them out easily. This project is both budget-friendly and rewarding. You’ll love how changing your photos with the seasons keeps your space feeling fresh and personal.
Here are some tips to get you started:
• Choose reclaimed wood for a more rustic look.
• Use twine and clothespins for a charming, relaxed feel.
• Pick a spot where sunlight hits to make the colors pop.
• Place seasonal photos to keep your display lively and engaging.
With this simple DIY project, you can create a beautiful focal point that tells your story while making your home feel warm and inviting. Get ready to enjoy your personalized art every day!
19. Scrap Wood Table Runner

Bring a touch of rustic charm to your dining area with a handcrafted scrap wood table runner. This simple yet striking piece adds character and warmth to any table setting. You can create yours using thin strips of reclaimed wood, arranged in a pattern that complements your dining table. Whether you choose to leave the wood in its natural state or paint it in bold, colorful hues, this runner transforms your table into a focal point. Popular on platforms like Pinterest, these runners are perfect for both casual meals and special gatherings.
Now, let’s get practical. You don’t need expensive materials to achieve this look. Visit your local hardware store or browse online for affordable scrap wood options. Cut the wood into strips of varying lengths for visual interest. Remember, a protective finish is essential if you plan to place food directly on the runner. Pair it with rustic tableware and centerpieces made from natural elements like flowers or candles to create a beautifully cohesive look. This small addition can make your dining experience feel more inviting and special, perfect for hosting family and friends.
Here are some quick tips:
• Choose reclaimed wood for a more sustainable option.
• Paint in rich colors to match your decor style.
• Seal with a protective coat if serving food directly.
• Pair with greenery for an organic touch.
With just a bit of effort, you can create a stunning table runner that reflects your personal style and makes every meal feel like a celebration.
20. Scrap Wood Key Holder

Looking for a stylish way to keep your keys in order? A scrap wood key holder is the perfect solution! This project blends functionality with rustic charm, making it a must-have for any home. Choose a long piece of reclaimed wood and sand it until it’s smooth. Add hooks or small wooden dowels to hang your keys securely. You can even paint it or use wood-burning techniques to create unique designs. Think earthy tones like deep browns or greens, or go bold with bright colors. Pinterest has plenty of creative ideas to inspire your design.
To make this project budget-friendly, look for scrap wood at local hardware stores or even in your garage. You can often find hooks and dowels at craft stores without spending much. If you want to take it a step further, attach a small shelf above the hooks. This extra space is perfect for holding mail, sunglasses, or other small items. The result? A practical piece that adds a personal touch to your entryway, making it feel organized and welcoming.
Here are some tips to get started:
• Choose reclaimed wood for a rustic look that’s eco-friendly.
• Add colorful hooks for a fun and playful touch.
• Paint or stain the wood for a custom finish that matches your decor.
• Install a small shelf for added storage and organization.
This simple project not only solves your key dilemma but also enhances your home’s style. Enjoy creating a piece that is both useful and uniquely yours!
21. Scrap Wood Wall Art Panels

Bring your walls to life with captivating scrap wood wall art panels! These panels are a fantastic way to add character to your space. You can create a striking visual display by arranging different sizes and types of wood. Try using reclaimed wood for a rustic vibe, or mix in some vibrant colors for a modern twist. This trend is popular on Pinterest, where you’ll find endless inspiration for unique arrangements.
To get started, choose pieces of wood that vary in texture and color. You might want to stain some boards in rich browns while painting others in soft pastels. Arrange them in a grid for a clean look, or go for a more casual, organic layout that flows with your room’s style. This project is budget-friendly, as you can often find scrap wood at local hardware stores or even in your own garage.
You’ll love how these panels instantly make your room feel warm and inviting, perfect for creating a cozy atmosphere.
• Arrange different wood types for variety
• Use stains and paints to enhance colors
• Hang in a grid or organic pattern for style
• Combine with metal or fabric for mixed-media flair
Scrap Wood Wall Art Panels
Editor’s Choice
22. Scrap Wood Wall Hooks

Scrap wood wall hooks are the perfect blend of functionality and style, making them a must-have for your home decor. These hooks not only keep your space organized, but they also add a rustic charm. Imagine cutting wood into fun shapes—like stars or hearts—and attaching stylish hooks. You can use them in your entryway for coats or in your bedroom for bags. Pinterest is full of these trendy designs, showcasing how simple pieces can become stunning focal points.
To get started, pick up some scrap wood from a local hardware store or even from your own garage. You can leave the wood natural for that cozy, rustic vibe or paint it in vibrant colors to make a statement. If you’re on a budget, this project is very wallet-friendly. The beauty of using scrap wood is that you can mix different types to create a unique look. This approach not only saves money but also makes your space feel personal and inviting.
• Choose diverse wood types for contrast
• Paint or stain for added style
• Hang at different heights for visual interest
• Use decorative hooks to enhance the look
With these easy steps, you can create wall hooks that not only serve a purpose but also express your creativity. Get ready to transform your walls into a stylish and functional display!
Scrap Wood Wall Hooks
Editor’s Choice

Indian Shelf Boho Decorative Wood Adhesive Wall Hooks for Coats – 3 Hook…

Tried & True Original Wood Finish, 8 oz. – Linseed Oil & Beeswax Blend, …

Wood Carving Kit Whittling Kit: Deluxe Wood Carving Tools Set with Leath…
23. Scrap Wood Fruit Bowl

Create a delightful scrap wood fruit bowl that adds a rustic flair to your kitchen. This project is perfect for both beginners and seasoned DIYers. You can shape a shallow bowl from thicker pieces of wood or even try a layered design for added depth and interest. Imagine using warm stains or bright paints that complement your kitchen decor. Rustic charm is a trend that’s gaining popularity on platforms like Pinterest, and this fruit bowl will certainly catch the eye of anyone who visits your home.
When making your bowl, consider a few practical tips. Choose wood that’s durable yet easy to work with, like pine or cedar. You can often find scrap wood at local hardware stores or even in your own garage. A simple sanding will give your bowl a smooth finish. Plus, this project is budget-friendly, as you can often make it with leftover materials. Once completed, your new fruit bowl will not only hold fresh produce but also serve as an inviting centerpiece, making your kitchen feel warm and welcoming.
• Choose sturdy wood like pine or cedar
• Use warm stains or vibrant paints
• Consider layering different wood types for visual interest
• Line the bowl with a cloth to protect delicate fruits
Scrap Wood Fruit Bowl
Editor’s Choice

Edge-glued Board by Walnut Hollow, Pine, 12″ x 16″ x 3/4″, (Pack of 1), …

8 Pack Sanding Sponge, Washable and Reusable Sanding Blocks for Drywall …
24. Scrap Wood Picture Ledge

Create a charming scrap wood picture ledge to showcase your favorite memories and artwork. This DIY project allows you to display photos in a unique way, adding character to your walls. Picture ledges are versatile, letting you mix and match frames in various colors and styles. You can use reclaimed wood for a rustic touch, or paint it for a pop of color. Pinterest users are loving this trend for its simplicity and style, making it perfect for any room.
To make your picture ledge, start by cutting a long, narrow strip of scrap wood. Secure it to the wall at a slight angle to keep your frames in place. This angle makes it easy to swap out photos whenever you like, so your display can change with your mood. Want to elevate the look? Create multiple ledges at different heights. This layered approach adds interest and makes your wall art feel dynamic and alive.
This project is budget-friendly, allowing you to repurpose leftover wood. It fits perfectly into a variety of design styles, from farmhouse to modern. You’ll love how it transforms your space, making it feel warm and inviting, perfect for family gatherings or cozy evenings.
• Choose reclaimed wood for a rustic vibe
• Cut ledges at different heights for visual interest
• Mix frame styles for an eclectic look
• Swap photos easily to keep things fresh
Now, go ahead and create your picture ledge. You’ll enjoy the process and love the result!
25. Scrap Wood Serving Tray

Create a stunning scrap wood serving tray that not only serves drinks but also adds charm to your home. Imagine hosting friends and serving snacks on a tray you’ve crafted yourself. You can make it rectangular or even a unique shape to fit your style. Choose bright paint colors for a fun look, or keep the natural wood finish for a more rustic feel. This kind of decor is trending on platforms like Pinterest, where people are showcasing their creative DIY projects.
To get started, gather your scrap wood pieces. Cut them to size for a sturdy base, and don’t forget to attach handles for easy carrying. If you’re on a budget, look for wood scraps at local hardware stores or even ask friends for leftover pieces from their projects. Once assembled, let your creativity shine! You can stencil on your favorite quotes or patterns for a personal touch. This serving tray is perfect for entertaining or as a centerpiece on your coffee table, making your space feel warm and inviting.
• Choose wood types that complement your decor style
• Pick fun colors or stains to match your home
• Add protective coating to keep it looking fresh
• Place it on a table for a stylish focal point
With these steps, you’ll have a beautiful serving tray that reflects your personality and showcases your DIY skills. Enjoy the compliments from guests as you serve them refreshments on your handcrafted piece. It’s not just a tray; it’s a conversation starter!
26. Scrap Wood Christmas Tree

Bring holiday cheer to your home with a charming DIY Christmas tree made from scrap wood! This project is not only fun but also a wonderful way to repurpose materials. Picture this: a tiered tree shape crafted from wood pieces of different lengths, standing proudly on a solid base. You can adorn it with twinkling lights, colorful ornaments, or even a splash of paint to make it pop. This rustic decoration looks great both inside your home and outside on your porch, instantly lifting the festive spirit.
To get started, gather scrap wood from your garage or a local wood shop. Use a mix of sizes to create visual interest. If you want to keep it simple, stick with natural wood tones. For a more modern twist, paint the wood in vibrant colors or even go for a metallic finish. This trend is all over Pinterest, inspiring many to create their unique versions.
Plan your tree’s design carefully. Make sure to secure your tree well, especially if it’s going outdoors. Choose weather-resistant paint if you want your creation to last through the season.
Here are some practical tips to guide you:
• Use a sturdy base to support your tree
• Pick different wood lengths for a tiered effect
• Add lights or ornaments for a festive touch
• Place it indoors or outdoors to spread holiday cheer
This scrap wood Christmas tree isn’t just a decoration; it’s a way to celebrate creativity and sustainability. Every glance at your handmade tree will fill your home with warmth and joy, making it a perfect centerpiece for holiday gatherings.
Scrap Wood Christmas Tree
Editor’s Choice

Gorilla Max Strength Construction Adhesive, Clear Glue, 2.5 Ounce Squeez…

Magicfly Outdoor Acrylic Paint, Set of 30 Colors/Tubes (60 ml, 2 oz.) wi…

YIQU Smart Color Changing Halloween Lights, 66 FT 200 LED RGB Christmas …
27. Scrap Wood Bookends

Create stunning scrap wood bookends that not only organize your books but also add flair to your space. Imagine sturdy blocks of wood in rich colors like walnut or light pine holding your favorite novels upright. You can easily personalize them with a coat of paint or a rustic stain. Pinterest is buzzing with ideas for these charming accents, showing how they can effortlessly elevate your decor.
To make your own, start with scrap wood pieces you already have. Cut them into geometric shapes that fit your style. If you want to add some character, try using stencils to create cute designs or attach old hardware for a vintage touch. These bookends are budget-friendly and allow you to express your creativity. Plus, they keep your bookshelf neat and inviting, making it feel warm and lived-in.
• Use sturdy wood pieces for durability
• Choose colors that match your room’s theme
• Pick unique designs to stand out
• Add personal touches like paint or hardware
With these tips, you can turn simple scrap wood into beautiful bookends that showcase your personality. Get started on this DIY project and enjoy the satisfaction of crafting something that’s both functional and stylish!
Transform your scrap wood into stunning bookends that not only hold your favorite novels but also elevate your decor! A splash of paint or a rustic stain can turn simple wood into a stylish statement piece.
28. Scrap Wood Garden Trellis

Elevate your garden’s charm with a stunning trellis crafted from scrap wood. This simple DIY project not only serves as a climbing frame for your plants but also adds a rustic touch to your outdoor space. Imagine using weathered wood in shades of brown and gray, creating a natural look that blends beautifully with your greenery. Popular on Pinterest, these trellises are perfect for supporting climbing roses or vibrant beans, giving your garden a cozy, inviting feel.
To get started, cut long pieces of wood into sturdy vertical supports. Then, use shorter pieces to form a grid pattern that encourages plants to vine upward. This method is not only functional but can be tailored to fit any garden style. You can find scrap wood at local hardware stores or even repurpose old pallets for an affordable solution. Just remember to choose treated wood for outdoor durability, ensuring your trellis withstands the elements.
Here are some tips to make your trellis project a success:
• Cut wood into vertical supports and horizontal slats.
• Choose treated wood for weather resistance.
• Vary slat spacing for different types of climbing plants.
• Paint or stain the wood for a personalized touch.
Building a scrap wood trellis not only supports your plants but also enhances your garden’s overall aesthetic. This project is perfect for DIY lovers who want to create a beautiful outdoor retreat, making your space feel more alive and welcoming.
Conclusion

These 28 scrap wood art projects show just how versatile and beautiful reclaimed wood can be in creating rustic wall decor.
From personalized signs to practical items like shelves and coasters, each project allows you to express your creativity while being eco-friendly.
Embrace the charm of upcycled wood and transform your living spaces into cozy sanctuaries of style!
Note: We aim to provide accurate product links, but some may occasionally expire or become unavailable. If this happens, please search directly on Amazon for the product or a suitable alternative.
This post contains Amazon affiliate links, meaning I may earn a small commission if you purchase through my links, at no extra cost to you.
Frequently Asked Questions
What Are Some Easy Scrap Wood Art DIY Projects for Beginners?
If you’re just getting started with scrap wood art DIY projects, you can try making simple items like wooden signs or picture frames. These projects require minimal tools and are perfect for practicing your skills. You can also create wooden coasters or shelves, which add a rustic touch to your home decor without being too complex. Don’t forget to personalize your creations with paint or wood stains!
How Can I Source Scrap Wood for My DIY Wall Decor Projects?
Sourcing scrap wood for your DIY wall decor projects can be easier than you think! Check local construction sites or woodworking shops that might have leftover pieces. You can also visit thrift stores or recycling centers, which often have wood scraps available for a small fee or even free. Additionally, consider reaching out to friends or family who might have unwanted wood lying around.
What Tools Do I Need for Scrap Wood Crafts?
For scrap wood crafts, you’ll need some basic tools to get started. A hand saw or jigsaw is essential for cutting wood pieces, along with a drill for making holes or attaching pieces. Don’t forget a sandpaper or a power sander to smooth out rough edges! A measuring tape and clamps will also be handy for precision and stability during your projects.
How Can I Make My Scrap Wood Art Stand Out in My Home Decor?
To make your scrap wood art stand out in your home decor, consider adding unique finishes like staining or painting to enhance the natural beauty of the wood. Incorporate different textures by combining wood with other materials like metal or fabric. Display your pieces in eye-catching arrangements or group them with other rustic home decor items to create a cohesive look that draws attention!
Are There Any Safety Tips I Should Follow When Working with Scrap Wood?
Absolutely! Safety is crucial when working with scrap wood. Always wear safety goggles to protect your eyes from dust and debris. Use ear protection if you’re using loud power tools. Make sure your workspace is clean to avoid accidents, and always follow the manufacturer’s instructions for any tools you use. Lastly, keep your hands clear of saw blades and other sharp tools to ensure a safe crafting experience!
Related Topics
scrap wood art
rustic decor
DIY wall art
upcycled wood
farmhouse style
handmade decor
easy projects
beginner friendly
budget decor
creative reuse
woodworking crafts
decorative accents