Have you been scrolling through Pinterest, admiring all those chic home decor ideas that seem to cost a fortune? I feel you! We all want our spaces to look stunning without breaking the bank. That’s why I created this post. I wanted to share practical solutions for transforming your home into a stylish sanctuary without the hefty price tag.
If you’re a DIY enthusiast, a budget-conscious decorator, or simply someone who loves adding personal touches to your living space, this list is for you. You might not have a ton of experience with woodworking or crafting, but that’s okay! These projects are designed to be easy to follow, ensuring that you can create beautiful pieces, even if you’re a beginner.
What can you expect from this collection of 25 simple DIY wood projects? You’ll find ideas that are not only affordable, but also versatile and stylish. From rustic shelves to elegant picture frames, each project adds a touch of charm that can elevate any room. Plus, these creations let your personality shine through, making your home feel uniquely yours.
So, grab your tools and let’s get started on these fun projects that will help you transform your space into something chic and inviting. Whether you’re sprucing up a single room or giving your entire home a makeover, you’ll find inspiration here. It’s time to turn those wood scraps into treasures!
1. Rustic Wooden Shelves

Create a warm and inviting atmosphere in your home with rustic wooden shelves. These charming pieces add a farmhouse vibe while providing practical storage. You can use reclaimed wood for an eco-friendly touch or fresh lumber for a clean, modern look. Try a simple floating shelf for a sleek design, or choose weathered barn wood for that authentic rustic appeal. Pinterest is buzzing with these styles, showcasing how they can enhance any room.
Building these shelves is easier than you might think. Start by measuring your space to find the perfect size. Look for affordable wood at local hardware stores or salvage yards to keep costs low. Once you have your materials, cut them to size and sand them down for a smooth finish. Securely mount them using sturdy brackets to ensure safety and stability. These shelves are not just functional; they can also transform your space, making it feel cozy and uniquely yours.
Tips:
• Use reclaimed wood for an eco-friendly touch.
• Choose brackets that match your decor style.
• Pick different stains to match your color scheme.
• Add personal items like books or plants for flair.
With these simple steps, you can create stunning rustic wooden shelves that elevate your home decor. They showcase your style and offer a practical solution for organizing your space, making your home feel more welcoming.
Rustic Wooden Shelves
Editor’s Choice

Rockin’ Wood Real Wood Nail Up Application Rustic Reclaimed Naturally We…

6 Pack Floating Shelf Brackets, 6 Inch Heavy Duty Industrial Shelf Brack…

2. Pallet Coffee Table

Creating a pallet coffee table is a delightful way to add personal style to your living room. These tables not only look great but also serve a practical purpose. You can use reclaimed wood pallets to build a one-of-a-kind piece. Consider staining the wood in a rich mahogany or painting it a bright color to match your decor. If you prefer a more rustic look, leave the pallets in their natural state. This trend is popular on platforms like Instagram, where many showcase their unique DIY projects.
To make your coffee table even more functional, add wheels to the bottom. This not only gives it a modern touch but also makes it easy to move around your space. If you want an elevated look, think about placing a glass top on your table. You can also create a storage shelf underneath for magazines and coasters, keeping your space tidy and stylish. This project is budget-friendly and perfect for expressing your creativity.
Here are some tips to get started:
• Use reclaimed pallets for an eco-friendly project.
• Choose colors that complement your existing decor.
• Add wheels for mobility and style.
• Incorporate a glass top for a polished finish.
This DIY pallet coffee table will not only enhance your living room but also give it a warm, inviting feel. With these simple steps, you can create a centerpiece that reflects your personality and is sure to impress your guests.
Pallet Coffee Table
Editor’s Choice

Reclaimed Wood Pallet Sign Blank -DIY Art – Made in the USA (12×18)

2″ Caster Wheels Set of 4, Heavy Duty Casters with Brake, No Noise Locki…

Dulles Glass 20 inch Round Glass Table Top – Tempered – 1/4″ Thick Glass…
3. Wooden Picture Frames

Bring your walls to life with stunning handmade wooden picture frames! These frames let you display your favorite memories in a way that truly represents your style. Choose from various woods, such as pine for a light, rustic feel or walnut for a rich, elegant look. You can even play with finishes—try a distressed look for vintage charm or a sleek stain for a modern touch. This DIY project is a great way to add a personal flair to your home decor.
Creating these frames is easy and fun. All you need are a few basic tools like a saw, sandpaper, and wood glue. You can find affordable wood at local hardware stores or even repurpose old furniture. Start by measuring your photos and cutting the wood accordingly. Sand the edges for a smooth finish, then assemble your frames. Don’t worry if they’re not perfect; that’s part of their charm!
Here are some tips to make your wooden frames shine:
Use different sizes and styles to create an eye-catching gallery wall.
Choose a color palette that complements your room’s decor.
Pick unique hardware, like vintage knobs, to add character.
Add a protective coat of varnish for durability.
A gallery wall filled with your handmade frames will make your space feel warm and inviting. It’s perfect for showcasing family photos or art pieces that inspire you. You’ll love how these frames turn ordinary wall space into a personal art gallery.
Wooden Picture Frames
Editor’s Choice

Gorilla Wood Glue; 8 Ounce Bottle; Natural Wood Color; (Pack of 1)

14 in. Pro Hand Saw, 11 TPI Fine-Cut Soft-Grip Hardpoint Handsaw Perfect…

Sand Paper, 48 PCS Sandpaper, 120 to 5000 Assorted Grit Sandpaper Sheets…
4. Wooden Blanket Ladder

Transform your space with a charming wooden blanket ladder. This stylish piece not only serves as a practical storage solution for your favorite throws but also adds a rustic flair to your living room or bedroom. Imagine warm wood tones against soft fabrics, creating a cozy atmosphere. Pinterest is buzzing with these ladders, showcasing their versatility in various decor styles, from farmhouse chic to modern minimalism.
Building your own blanket ladder is easier than you might think. Start with some wooden planks and a few basic tools. Sand the wood to a smooth finish, and consider adding a rich stain or paint to match your decor. You can find affordable wood at local hardware stores or even repurpose old furniture. Position your ladder in a corner or lean it against a wall to save space while making a statement. This simple addition will make your room feel more inviting and organized.
Tips:
• Use sturdy wood like pine or oak for durability.
• Choose a stain color that complements your existing decor.
• Place the ladder in a low-traffic area to avoid wear.
• Add hooks to hang scarves or other textiles for extra flair.
With just a little effort, your handmade blanket ladder can elevate the look of your home while keeping your favorite blankets close at hand.
Wooden Blanket Ladder
Editor’s Choice

10 Pieces 3.5×1.6×0.2 Inch Unfinished Wood Rectangle Board for Paintings…

Varathane Premium Fast Dry Wood Stain, Half Pint, Dark Walnut

Sundpey Home Tool Kit 148-Pcs – Household Basic portable Hand Repair Too…
5. DIY Wood Coasters

Bring warmth and charm to your home with DIY wood coasters. These simple projects not only protect your surfaces but also add a rustic touch to your decor. Imagine sipping coffee on a beautiful slice of wood that you’ve customized just the way you like. You can easily paint, stain, or even use wood burning techniques to create coasters that reflect your personal style. This trend is popular on platforms like Pinterest, where unique designs inspire creativity.
Creating wood coasters is an affordable way to dive into woodworking. Start with wood slices from your local craft store or even fallen branches in your yard. You can experiment with different shapes and sizes to match your decor. To make them last, consider applying a sealant for water resistance. This small step ensures that your coasters stay beautiful and functional. Plus, they make fantastic gifts for friends and family, adding a personal touch to any occasion.
Tips for Your DIY Wood Coasters:
• Choose various wood types for a unique layered effect.
• Experiment with colors to match your home decor.
• Seal with a clear varnish for added protection against moisture.
• Personalize with initials or designs to make them special.
Creating your own wood coasters is not just about function; it’s about infusing your space with personality. With a bit of creativity, you can craft pieces that are not only useful but also beautiful, making your home feel warm and inviting.
DIY Wood Coasters
Editor’s Choice

FSWCCK 6 Pack Nature Unfinished Round Wood Slices, 7-8 Inches Wooden Cir…

Krylon K01305 Gallery Series Artist and Clear Coatings Aerosol, 11-Ounce…
6. Simple Wood Bench

Imagine adding a simple wood bench to your space. It’s an easy way to boost both seating and style in your home or garden. You can choose from various types of wood to fit your personal taste and the mood of the area. If you love a rustic vibe, reclaimed wood works beautifully. For a sleek, modern look, opt for smooth lines and a minimalist design.
You can leave the bench in its natural state for a warm, authentic feel. Or, if you prefer, apply a stain and seal it for extra protection against the elements. Pinterest is buzzing with ideas on how to personalize your bench. Think about painting or stenciling fun designs on the surface. This way, your bench becomes a true reflection of your personality!
Next, let’s talk about how to make this project a reality. Start by measuring your space to ensure a perfect fit. Head to your local hardware store or lumberyard for affordable wood options. You might even find some great deals on reclaimed materials if you keep an eye out.
This bench can be a focal point in your living room or a cozy addition to your garden. It’s perfect for enjoying a sunny day or for extra seating during gatherings. Plus, a well-crafted bench adds charm and comfort to any area.
Practical Tips:
• Choose reclaimed wood for a rustic look
• Opt for smooth, straight lines for a modern feel
• Use weather-resistant finishes for outdoor durability
• Paint or stencil designs for a personal touch
With these ideas, you can create a stunning wood bench that elevates your space without breaking the bank. Get started today and enjoy the beauty of your handiwork!
Simple Wood Bench
Editor’s Choice

Olympic WaterGuard 11 oz. Clear Exterior Waterproofing Wood Sealer Spray

Wood Carving Kit Whittling Kit: Deluxe Wood Carving Tools Set with Leath…

Rustic Weathered Reclaimed Wood Planks for DIY Crafts, Projects and Deco…
7. Wooden Planter Box

Create a beautiful wooden planter box to bring nature right into your home or garden! This simple project allows you to customize the size to fit your favorite plants or herbs. A classic rectangular design adds a rustic charm, while tiered planters create a stunning focal point. As a bonus, you can find inspiration on platforms like Pinterest, where DIY planters are trending and loved by many.
When selecting materials, opt for weather-resistant wood if you plan to place your planter outdoors. This ensures your creation will withstand the elements while thriving in your garden. A personalized touch can elevate your planter’s look. Consider painting it in eye-catching colors or using stencils to add unique patterns that reflect your style. This way, your planter becomes not just a plant holder but also a piece of art that brightens your space.
Here are some practical tips to get started:
• Choose durable wood like cedar or redwood for outdoor planters.
• Pick vibrant paints or stains that match your home decor.
• Add drainage holes to keep your plants healthy.
• Place it near a window or on your patio to enjoy your plants daily.
Creating a wooden planter box is budget-friendly and adds a personal touch to your home. By engaging with nature through gardening, you create a cozy and inviting atmosphere perfect for relaxation and enjoyment.
Bring a touch of nature indoors! A simple DIY wooden planter box can turn your favorite plants into stunning decor, blending rustic charm with personal flair. Ready to grow your home decor game?
Wooden Planter Box
Editor’s Choice

175 Pcs Mini Acrylic Paint Set for Kids 50 Plastic Plant Pot with Holes …
8. Wall Art from Wood Scraps

Create stunning wall art using leftover wood scraps from your projects! This is a fantastic way to add personality to your home while keeping costs down. You can arrange various pieces of wood in different sizes and colors to design something unique. From abstract shapes to geometric patterns, your creativity can truly shine. Think about using warm tones like rich browns or cool greys that fit your room’s style. Pinterest is full of inspiring ideas that show how these pieces can transform a dull wall into a focal point.
To bring your art to life, start by gathering your wood scraps. Use wood glue to attach the pieces securely together. Once your design is set, consider adding a simple frame to give it a polished look. This project is not only affordable but also encourages recycling. You can customize your wall art to complement any room, whether it’s above your sofa or in a hallway. It’s perfect for making spaces feel warm and inviting.
Tips:
• Choose a variety of wood types for texture and contrast.
• Use neutral colors to match any decor style.
• Pick a size that fits your wall space perfectly.
• Hang your artwork at eye level for the best display.
This DIY project not only beautifies your home but also tells a story of creativity and resourcefulness. Enjoy the satisfaction of making something truly your own!
Wall Art from Wood Scraps
Editor’s Choice
Gorilla Wood Glue; 8 Ounce Bottle; Natural Wood Color; (Pack of 1)

LUCKYLIFE Picture Frames Collage Wall Decor 10-Pack, Gallery Wall Frame …

9. Rustic Wood Candle Holders

Transform your space into a cozy retreat with rustic wood candle holders. These charming accents bring warmth and style to any room, making them a perfect addition to your home decor. You can create these holders from simple wood slices or small blocks, giving you plenty of options to match your aesthetic. Consider drilling holes for tea lights or taper candles to elevate their look. Whether you choose natural wood tones or opt for a splash of color with stains or paint, these holders can easily fit into your existing decor. Pinterest is full of inspiring ideas, showcasing how these pieces can enhance your living space.
To make your candle holders truly stand out, consider grouping several together. This creates a stunning centerpiece for your dining table or mantel. Plus, adding embellishments like twine or dried flowers around the base adds a personal touch. These candle holders are not only affordable but also a fun DIY project that can be completed in just a few hours. They’re perfect for setting the mood during dinner parties or creating a warm atmosphere for cozy nights in.
• Select wood slices or blocks for easy crafting
• Drill holes for tea lights or taper candles
• Stain or paint to match your decor style
• Group multiple holders for a dramatic effect
This simple project allows you to showcase your creativity while adding a rustic charm to your home. Enjoy the warm glow of candles while basking in the cozy atmosphere you’ve created.
Rustic Wood Candle Holders
Editor’s Choice

Sukh 20PCS Christmas Natural Wood Slices – Unfinished Wood Slices 2.7-3….

DEWALT Titanium Nitride Coated Drill Bit Set, Pilot Point, 21-Piece (DW1…

Furniture Clinic Wood Stain | Natural Oak | Water Based | Fast Drying, L…
10. Wooden Serving Tray

Crafting a wooden serving tray is a fantastic way to combine functionality with style. This simple project not only enhances your entertaining game but also brings a touch of warmth and elegance to your home. Imagine a beautiful, custom tray that perfectly matches your decor. You can choose natural wood tones for a rustic feel or go bold with bright paint for a pop of color. As seen in many home decor blogs, a personalized serving tray is a trending accessory that adds character to any space.
To get started, grab a piece of wood and cut it to your ideal size. Adding handles can make it easier to carry and can also serve as a design element. For a personal touch, think about painting or staining the wood in colors that complement your existing decor. This project is budget-friendly, allowing you to create something unique without spending a fortune. Whether you use it for serving snacks at a party or as a decorative piece on your coffee table, it will make your space feel more inviting.
Here are some practical tips to make your wooden serving tray shine:
Choose a sturdy wood like pine or oak for durability.
Pick a stain or paint color that matches your home’s style.
Add handles that suit your design, like leather or metal.
Place decorative items on the tray to showcase your style, like candles or small plants.
With this wooden serving tray, you’ll create not just a practical item, but a beautiful addition to your home. It’s perfect for hosting gatherings or simply enjoying a cozy night in, making every moment special.
11. DIY Wood Sign

Bring warmth and personality to your home with a DIY wood sign. These charming decorations can transform a plain wall or garden into a welcoming space. Imagine a hand-painted “Home Sweet Home” sign hanging by your front door or a directional sign pointing to your patio and garden. Choose colors that match your decor, like soft pastels or bold hues. Pinterest is buzzing with ideas for these signs, showcasing how simple and stylish they can be.
To get started, you only need a few materials: a piece of wood, paints, and brushes. You can use stencils for precise lettering or freehand your designs for a more personal touch. If you’re placing the sign outdoors, remember to seal it with a weatherproof finish to protect it from the elements. This project is not only budget-friendly, but it also lets you express your creativity. Picture your guests admiring your handmade sign, making your home feel truly unique and inviting.
Tips:
• Use reclaimed wood for an eco-friendly touch.
• Choose cheerful colors to brighten your space.
• Place your sign at eye level for maximum impact.
• Add decorative elements like flowers or fairy lights for extra charm.
This DIY wood sign project is perfect for anyone looking to enhance their home decor without spending a lot. It’s a fun way to showcase your style and make your space feel cozy and welcoming.
12. Wooden Key Holder

Transforming your entryway with a wooden key holder is a smart way to combine style and functionality. This simple project helps you keep your keys organized while adding a personal touch to your decor. You can choose a rustic wood finish or go bold with a bright color that complements your space. Trendy designs often feature a mix of natural wood and painted elements, creating a warm and inviting vibe. As seen on Pinterest, these key holders not only serve a purpose but also enhance your home’s aesthetic.
To make your wooden key holder, start with a small plank of wood. Sand it down for a smooth finish, then attach sturdy hooks for your keys. Don’t shy away from adding a little flair—consider stenciling your family name or a fun phrase on the wood. For an extra touch, include a small shelf above the hooks for mail or other essentials. This project is budget-friendly and takes just a couple of hours, making it perfect for a weekend DIY.
Here are some tips to get started:
Choose reclaimed wood for a unique, eco-friendly look.
Pick hooks that match your style—metal for industrial or colorful for a playful vibe.
Add a small shelf above for mail or sunglasses.
Place it near your door for easy access and visibility.
With this wooden key holder, you’ll create a stylish solution to the everyday problem of lost keys. Plus, it adds a personalized touch that makes your home feel more inviting.
13. Wooden Wall Clock

Creating a wooden wall clock is a fun way to bring both style and function into your home. Imagine how a beautifully crafted clock can become a focal point in your living room or hallway. You can use a simple piece of wood and choose from a classic round shape or a more unique design that matches your personality. Pinterest is buzzing with ideas for these eye-catching pieces, showcasing everything from minimalist styles to rustic charm.
To get started, pick a piece of wood that speaks to you. You can easily find affordable options at local hardware stores or even use reclaimed wood for a vintage vibe. After shaping your clock, add clock mechanisms and numbers. If you want to elevate the design, consider mixing different wood types or applying a stain that complements your home’s color palette. A DIY wall clock not only tells time but also adds warmth and character to your space, making it feel inviting and personalized.
Tips for Your Wooden Wall Clock:
• Choose wood that matches your decor style
• Mix wood types for a unique look
• Add a stain that complements your existing colors
• Place it at eye level for maximum impact
This project is not just about creating a clock; it’s about expressing yourself and enhancing your home. Each tick will remind you of your creativity and effort, making your space feel even more like home.
14. Rustic Wood Hooks

Bring a touch of rustic charm to your home with simple wood hooks. These stylish additions are not only functional but also serve as eye-catching decor. Imagine using reclaimed wood with a weathered finish, or even painting them in earthy tones to match your room’s vibe. Pinterest loves these creative hooks, showcasing them in various designs that fit perfectly in entryways, kitchens, or even bathrooms. They instantly add warmth and character to your space.
To make these hooks, start with small pieces of wood. You can either mount them directly onto the wall or attach several to a sturdy board for a more organized look. Customize the size and finish to align with your decor style. This project is friendly on your wallet, using scrap wood or materials you might already have at home. The result? A cozy, organized space that feels both inviting and personal.
Tips for Your Rustic Wood Hooks:
• Use reclaimed wood for a unique touch and eco-friendly option.
• Choose varied sizes to create an eye-catching display.
• Add a coat of stain for a polished look that enhances the grain.
• Place hooks near entryways for easy access to coats and bags.
These hooks are not just practical; they also reflect your creativity. They help keep your space tidy while adding a personal flair that makes your home feel truly yours.
Rustic Wood Hooks
Editor’s Choice

Creative Hobbies 10×10 Inch Unfinished Wood Hanging Plaque – DIY Pallet …

REALINN Wood Furniture Repair Kit- Set of 28 – Touch Up Markers, Fillers…

Railroad Spike Cast Iron Hooks (10 Pack) Handmade Blacksmith, Wall Mount…
15. Rustic Wood Tray for Plants

A rustic wood tray adds charm and warmth to your home, especially when showcasing your favorite plants. Imagine a simple rectangular or round tray, crafted from natural wood, that cradles your pots while enhancing your space. You can paint or stain the wood to fit your decor, whether that’s a cozy farmhouse style or a modern minimalist look. As seen on Pinterest, these trays are trending for their ability to blend style with function, making them a must-have for plant lovers.
Creating your own rustic wood tray is not only fun but also budget-friendly. Start with reclaimed wood or purchase inexpensive boards from your local hardware store. Sand the edges for a smooth finish, and choose a color that complements your plants—think earthy browns or a distressed white for that vintage vibe. Adding a waterproof liner will make cleaning a breeze, ensuring your tray stays in top shape. This simple project allows you to express your creativity while making your home feel inviting and cozy.
Tips:
• Use reclaimed wood for an eco-friendly touch
• Choose earthy tones or distressed finishes for style
• Pick a size that fits your space, like a coffee table or windowsill
• Add a waterproof liner for easy cleaning
Your rustic wood tray can become a beautiful centerpiece, perfect for displaying succulents or vibrant flowers. It brings nature indoors, creating a soothing atmosphere and inviting conversations. Enjoy the process of making it your own!
Rustic Wood Tray for Plants
Editor’s Choice
Rockin’ Wood Real Wood Nail Up Application Rustic Reclaimed Naturally We…

iDesign Plastic Under Sink Mat Tray for Kitchen Cabinet, Bathroom, Entry…
16. Wooden Wall Shelf with Hooks

Create a stunning focal point in your home with a wooden wall shelf that incorporates hooks for added functionality. This stylish addition is perfect for any space—be it your entryway, kitchen, or bathroom. Imagine a warm, natural wood shelf displaying your favorite plants while offering hooks to hang keys, towels, or even kitchen utensils. Trending designs on platforms like Pinterest show how these shelves can elevate your decor while keeping everything organized and accessible.
To start this project, gather a solid piece of wood that suits your style—think reclaimed barn wood for a rustic look or sleek pine for a modern touch. You will also need brackets for support and hooks for hanging. Measure your space carefully to ensure a perfect fit. Once your shelf is installed, let your creativity flow! Adorn it with small potted plants, decorative bowls, or even a few framed photos to make it uniquely yours. This project not only adds character but also makes your space feel inviting and well-organized.
• Choose a wood finish that suits your home decor style, like walnut or whitewash.
• Pick decorative hooks that match your shelf—go for vintage or modern styles.
• Add plants or photos to personalize the shelf and create a warm atmosphere.
• Place in high-traffic areas to maximize functionality and style, like near the front door or above a kitchen counter.
This wooden wall shelf with hooks is more than just a practical storage solution; it’s a canvas for your personal style. Enjoy the blend of beauty and utility while keeping your space tidy and chic.
17. Wood Table Centerpiece

Creating a wood table centerpiece can instantly uplift your dining or coffee table. This simple yet stylish addition draws the eye and brings warmth to your space. Imagine a rustic wooden box filled with seasonal flowers, candles, or even fresh fruits. You can easily adjust the size to fit your table perfectly. Choose a stain that complements your existing decor or paint it in trendy colors for a modern touch. Pinterest is buzzing with ideas for these centerpieces, making them a popular choice for home decorators.
To get started, gather some basic materials. You can use reclaimed wood for a budget-friendly option that adds character. Cut the wood to your desired dimensions and sand it down for a smooth finish. If painting, select colors that harmonize with your room’s palette. Seasonal decorations allow you to change the look throughout the year. This project not only beautifies your home but also gives you a chance to express your creativity, making it feel truly personal.
Here are some quick tips:
• Choose natural wood for a rustic vibe
• Paint in bold colors for a modern twist
• Fill it with seasonal items like pinecones in winter
• Place it on your dining table or coffee table for added charm
With just a little effort, you can create a centerpiece that transforms your space. Enjoy the process and watch your home come alive with style and warmth!
Wood Table Centerpiece
Editor’s Choice

8 Pack Sanding Sponge, Washable and Reusable Sanding Blocks for Drywall …
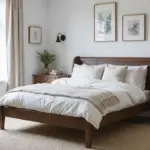
18. Wooden Bedside Table

A wooden bedside table isn’t just a piece of furniture; it’s a stylish solution for your bedroom needs. Picture a cozy space with a beautifully crafted table beside your bed. You could choose a warm walnut finish or a sleek white paint to match your décor. Current trends show that minimalistic designs are in, making them perfect for any modern or rustic-themed room.
To create your bedside table, look for simple plans online. You can easily build a sturdy tabletop with a couple of strong legs. If you’re feeling creative, add a splash of color or a unique finish that reflects your personality. Consider incorporating a drawer or a lower shelf for extra storage of your favorite books or nighttime essentials. This way, you keep your space tidy while adding a touch of charm.
\n\n
Here are some tips to help you get started:
Use reclaimed wood for a rustic look that’s eco-friendly.
Choose a design with clean lines for a modern vibe.
Add a coat of chalk paint for a trendy, textured finish.
Place your table near your bed for easy access to essentials.
\n\n
With these ideas, your new bedside table will not only serve its purpose but also enhance the warmth and style of your bedroom. It’s the perfect project to express your creativity while being practical and affordable.
Wooden Bedside Table
Editor’s Choice

Bright Creations Shelf Wood Boards – 3.5 x 12 x 0.5 in, 6-Pack Reclaimed…

FolkArt Home Decor Chalk Furniture & Craft Acrylic Paint in Assorted Col…
Wood Carving Kit Whittling Kit: Deluxe Wood Carving Tools Set with Leath…
19. Wooden Garden Trellis

Create a stunning focal point in your garden with a DIY wooden trellis! This project not only supports your climbing plants but also beautifies your outdoor space. You can choose natural wood for a rustic look or paint it in vibrant colors to match your style. Pinterest is buzzing with ideas on how to personalize your trellis, making it a chic addition to any garden.
To get started, gather some wood stakes and strips. Measure your space and design a trellis that fits perfectly against a wall or within a flower bed. Make sure to secure it well so it can hold the weight of climbing plants like sweet peas or honeysuckle. This project is budget-friendly and allows you to express your creativity. Imagine how inviting your garden will feel with a stylish trellis drawing the eye!
Tips to make your trellis shine:
• Choose durable wood like cedar or treated pine for longevity.
• Paint it a bold color to make it a standout feature or leave it natural for a classic look.
• Position it wisely where it can support plants and catch sunlight.
• Add climbing plants like ivy or morning glories to enhance its beauty.
With your new trellis, your garden will not only be functional but also a lovely retreat. It will surely be a conversation starter and a beautiful backdrop for your outdoor adventures.
Transform your garden with a simple DIY wooden trellis! It’s not just a support for plants, but a stylish focal point that reflects your unique flair.
Wooden Garden Trellis
Editor’s Choice


Rust-Oleum 1993502 Painter’s Touch Ultra Cover Multi-Purpose Brush-On Pa…

Sweet Pea Seeds 200 Seeds – Non-GMO Heirloom Organic Seeds Brightly Colo…
20. Wooden Toy Box

A wooden toy box is a fantastic solution for keeping your child’s play area tidy and stylish. Imagine a beautifully crafted box made from sturdy wooden planks, perfect for storing toys and games. You can choose bright colors or natural wood finishes that match your child’s room. Personalizing it with their name or a playful design adds a special touch. These toy boxes are trending on platforms like Pinterest, where parents showcase their creative storage solutions.
To bring this project to life, start by selecting high-quality wood that fits your budget. You don’t need to spend a fortune; reclaimed wood or plywood can be both affordable and charming. Make sure to sand the edges for safety, especially if little hands will be using it. A simple lid with hinges will keep toys secure and safe. This toy box not only keeps the room organized but also turns cleaning up into a fun activity for your child.
Here are some tips to get started:
• Choose safe, non-toxic finishes for a child-friendly design.
• Opt for bright colors to make it fun and engaging.
• Personalize with stencils or decals for a unique look.
• Place it near the play area for easy access and cleanup.
Creating a wooden toy box is not just about storage; it’s about adding character and functionality to your home. Your child will love having a special place for their toys, making their space feel more organized and inviting.
Wooden Toy Box
Editor’s Choice

Tried & True Original Wood Finish, 8 oz. – Linseed Oil & Beeswax Blend, …
21. Wooden Mail Organizer

Bring order and style to your home with a DIY wooden mail organizer. This charming project not only helps you manage your mail but also adds a rustic flair to your entryway or office. Imagine a beautifully crafted piece in warm wood tones, perfectly complementing your decor. You can paint or stain it to match your style, whether it’s modern, farmhouse, or eclectic. Pinterest is buzzing with ideas for these organizers, showcasing their versatility in any space.
To create your own, begin by measuring your available wall space. Choose wood that suits your taste—cedar, pine, or even reclaimed wood can work beautifully. Aim for a design that includes mail slots and hooks for your keys. This keeps everything neat and accessible. You can even add personal touches like stenciled labels to categorize letters, bills, and important documents. The result? A functional piece that reflects your style and helps you stay organized.
Tips:
• Use sturdy wood for durability and style.
• Choose a color that complements your existing decor.
• Add hooks for keys to keep everything in one place.
• Personalize with stencils for added flair.
By making your own wooden mail organizer, you not only save money but also create something unique. This piece will make your home feel more organized and inviting, perfect for impressing guests or just enjoying a tidy space.
\n\n
Let’s get started on this fun project today!
22. Wooden Wall Organizer

Creating a wooden wall organizer can solve your clutter problems while adding a stylish touch to your home. Imagine a beautiful piece hanging on your wall, showcasing your personality. You could use a natural wood finish for a warm, rustic feel or paint it in vibrant colors that match your décor. Pinterest trends show that these organizers are not just functional but also serve as a focal point in any room.
To make your wall organizer, start with a simple design featuring compartments for mail, pens, and other small items. You can easily find affordable wood at local hardware stores or repurpose old furniture. Consider adding hooks for keys or bags, too. This project blends organization with creativity, transforming your space into a tidy and welcoming area.
Here are some practical tips to make your wooden wall organizer shine:
Use reclaimed wood for an eco-friendly option that looks great.
Choose colors that complement your existing decor for a cohesive look.
Add decorative elements like small plants or framed photos to personalize your piece.
Place it near your entryway or home office for easy access to your essentials.
This wooden wall organizer not only keeps your space tidy but also reflects your style, making your home feel uniquely yours. It’s a perfect weekend project that brings both function and flair to your living space.
Wooden Wall Organizer
Editor’s Choice

Acrylic Paint Set, 24 Colors (2 oz/Bottle) with 12 Art Brushes, Art Supp…
23. Wooden Deck Chairs

Crafting your own wooden deck chairs can elevate your outdoor experience. Picture this: a pair of stylish chairs, made from sturdy wood, that fit perfectly on your patio or deck. You can choose rich, natural tones or go bold with bright paint. Add comfy cushions in fun patterns to invite relaxation. This trendy project is all over Pinterest, inspiring many to create their own outdoor retreats.
When you start building, think about making folding chairs. They save space and are easy to move. Look for affordable wood at your local hardware store or use reclaimed materials for a unique touch. Keep your budget in check while creating a cozy nook for weekend lounging or summer gatherings.
Here are some tips to get you started:
• Choose weather-resistant wood like cedar or redwood for durability.
• Pick colors that complement your existing outdoor decor.
• Add cushions in bright fabrics for extra comfort.
• Place your chairs in a sunny spot to enjoy the warmth.
Building wooden deck chairs is more than just a project; it’s about creating a welcoming space. You’ll love spending evenings under the stars or enjoying a morning coffee. This DIY venture not only beautifies your outdoor area but also encourages you to unwind and savor nature’s beauty. Dive into this project and watch your outdoor space transform!
Transform your outdoor space with simple DIY wood projects! A pair of handcrafted deck chairs not only invites relaxation but also adds a chic touch to your home decor. Let’s create your perfect retreat!
Wooden Deck Chairs
Editor’s Choice

Woodworking with Hand Tools: Tools, Techniques & Projects
24. Wooden Wine Rack

Creating a wooden wine rack can bring a touch of sophistication to your home bar or dining area. Imagine displaying your favorite bottles in a stylish manner that complements your decor. A simple design can hold your wine bottles safely while turning them into a beautiful focal point. You can choose to stain the wood in a rich mahogany or paint it a bright white to match your style. As seen on Pinterest, wooden wine racks are trending, making your space feel both modern and inviting.
To get started, gather some affordable materials like reclaimed wood or plywood. Look for plans online that suit your skill level. If you’re new to woodworking, consider a basic design with straight lines. Don’t forget to add a small shelf for glasses or corkscrews. This extra touch makes your rack more functional and keeps everything organized. When guests arrive, they’ll appreciate the personal flair you’ve added to your entertaining space.
Here are some tips to guide you:
• Choose reclaimed wood for an eco-friendly and unique look.
• Stain or paint to match your existing decor.
• Add a shelf for glasses or accessories to boost functionality.
• Follow online tutorials for easy step-by-step instructions.
With these simple steps, you can build a wine rack that not only stores your bottles but also elevates your home’s style. This project is perfect for wine lovers and adds a personal touch to your gatherings. Enjoy the satisfaction of creating something beautiful and useful!
Wooden Wine Rack
Editor’s Choice
REALINN Wood Furniture Repair Kit- Set of 28 – Touch Up Markers, Fillers…
Wood Carving Kit Whittling Kit: Deluxe Wood Carving Tools Set with Leath…
Rockin’ Wood Real Wood Nail Up Application Rustic Reclaimed Naturally We…
25. DIY Wooden Headboard

Create a DIY wooden headboard to elevate your bedroom into a cozy retreat. Imagine a stunning backdrop made from reclaimed wood or fresh planks, adding warmth and character to your space. You can customize the headboard to match your style, whether you prefer a rustic farmhouse vibe or sleek modern lines. Pinterest is buzzing with ideas for unique shapes and finishes. You can even paint it a bold color or leave it natural for a timeless look.
Let’s talk about how to make this project a reality. Start by measuring your bed to ensure the headboard fits perfectly. Then, gather your materials—wood, screws, and sandpaper. You can often find affordable wood at local hardware stores or even salvage yards. Once you have everything, cut the wood to size and assemble it. Remember to sand down any rough edges and apply a finish to protect the wood. This project is not just about aesthetics; it’s a fun way to add a personal touch to your home.
Here are some tips to enhance your wooden headboard:
• Choose reclaimed wood for an eco-friendly option.
• Add built-in shelves for extra storage or display space.
• Incorporate LED lights for a warm, inviting glow.
• Place decorative pillows against it for added comfort.
With these ideas, your headboard will not only look beautiful but also feel like a true sanctuary. You’ll love how it transforms your bedroom into a personal escape!
Conclusion

Embracing DIY wood projects offers a wonderful opportunity to infuse your home with personal touches, all while sticking to a budget.
With these 25 rustic farmhouse-inspired ideas, you can create chic decor that reflects your style and enhances your space.
So gather your tools, get creative, and start crafting pieces that will make your home feel truly yours!
Note: We aim to provide accurate product links, but some may occasionally expire or become unavailable. If this happens, please search directly on Amazon for the product or a suitable alternative.
This post contains Amazon affiliate links, meaning I may earn a small commission if you purchase through my links, at no extra cost to you.
Frequently Asked Questions
What Are Some Easy DIY Wood Projects for Home Decor?
Looking for inspiration? Some easy DIY wood projects for home decor include rustic picture frames, wooden signs with inspirational quotes, and simple shelving units. These projects are not only fun to create but also add a personal touch to your space. Plus, they fit perfectly into the rustic farmhouse-inspired aesthetic!
How Can I Create Budget Home Decor with Simple DIY Wood Projects?
Creating budget home decor is a breeze with simple DIY wood projects! Start by repurposing old wood or pallets, which can often be found for free or at a low cost. Use these materials to make items like coffee tables, plant stands, or decorative trays. This way, you can achieve a chic look without breaking the bank!
What Tools Do I Need for DIY Wood Projects?
For successful DIY wood projects, you’ll want to have a few essential tools on hand. A good quality saw, a drill, sandpaper, and wood glue are some basics to get you started. Don’t forget safety gear like goggles and gloves! With these tools, you can tackle a variety of woodworking projects and create beautiful DIY home accents.
Are Rustic Wood Crafts Difficult to Make?
Not at all! Many rustic wood crafts are surprisingly simple and beginner-friendly. Projects like wooden coasters or a rustic candle holder can be made with minimal experience. The key is to choose projects that match your skill level and gradually challenge yourself as you gain confidence and expertise!
Can I Use Recycled Materials for My DIY Home Improvements?
Absolutely! Using recycled materials for your DIY home improvements is a fantastic way to be eco-friendly and save money. You can transform old furniture, reclaimed wood, or even pallets into stunning decor items. Not only does this align with the budget home decor ethos, but it also adds unique character to your home!
Related Topics
home decor
rustic farmhouse
simple DIY
woodworking projects
budget home decor
DIY home accents
easy home improvements
beginner friendly
rustic wood crafts
affordable decor
quick DIY
interior styling